English follows Korean
얼마전에 사진 정리 도구를 Piwigo에서 PhotoPrism으로 변경했습니다. Piwigo는 매우 좋은 어플리케이션이지만, PhotoPrism의 현대적인 느낌과 AI를 이용한 사진 분류기능이 매력적입니다. PhotoPrism은 Golang으로 개발되어 있으며, REST API를 통해 다양한 프로그래밍 언어로 활용할 수 있습니다. (Browse Your Life in Pictures – PhotoPrism). 그러나 여러 예시가 Golang이라 그것을 활용해 보았습니다. Golang은 처음이로 ChatGPT를 이용해서 Library와 Sample을 만들었습니다.
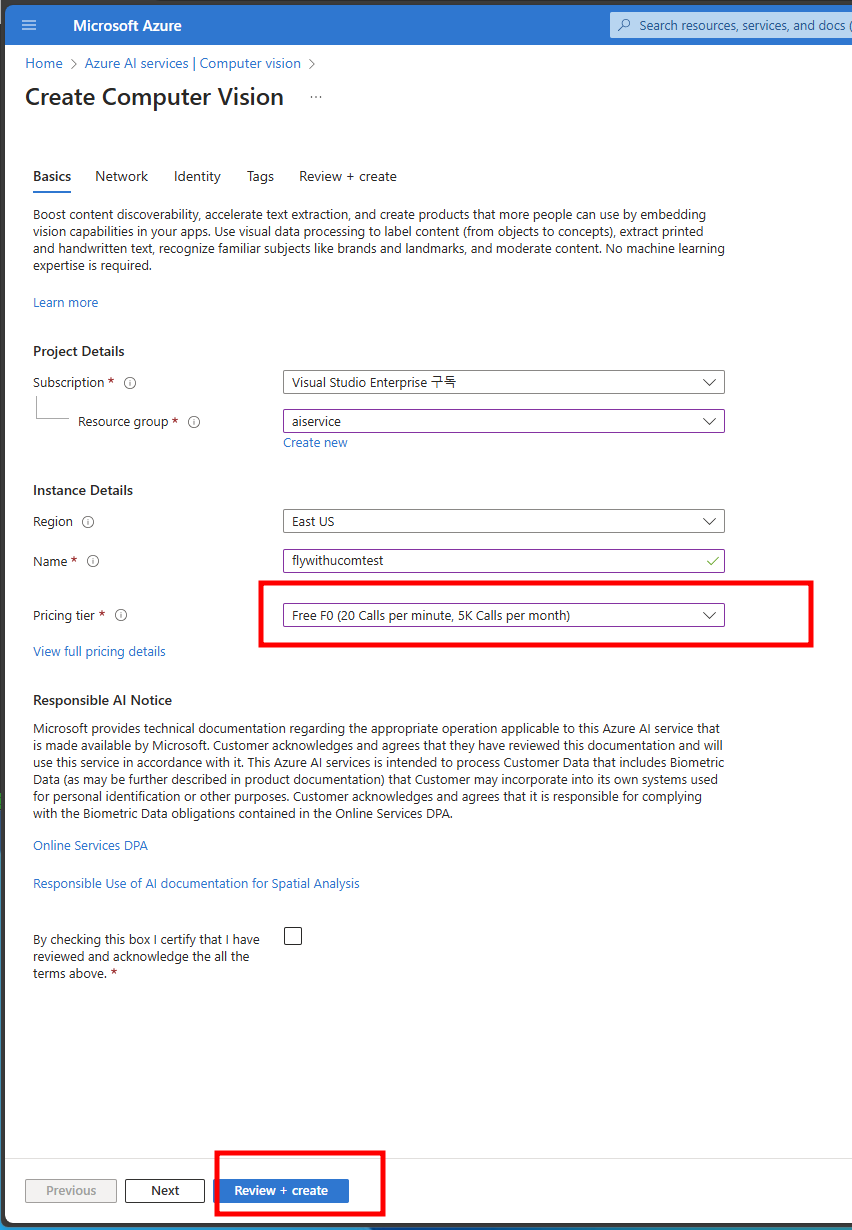
AzureAI를 사용해 태그를 추가하고, Piwigo의 사진을 PhotoPrism에 업로드 하는 것이 골이 었고, AzureAI를 사용한 이유는 일정범위(개인용으로 충분한)에서 무료 사용기 가능하다는 점입니다.
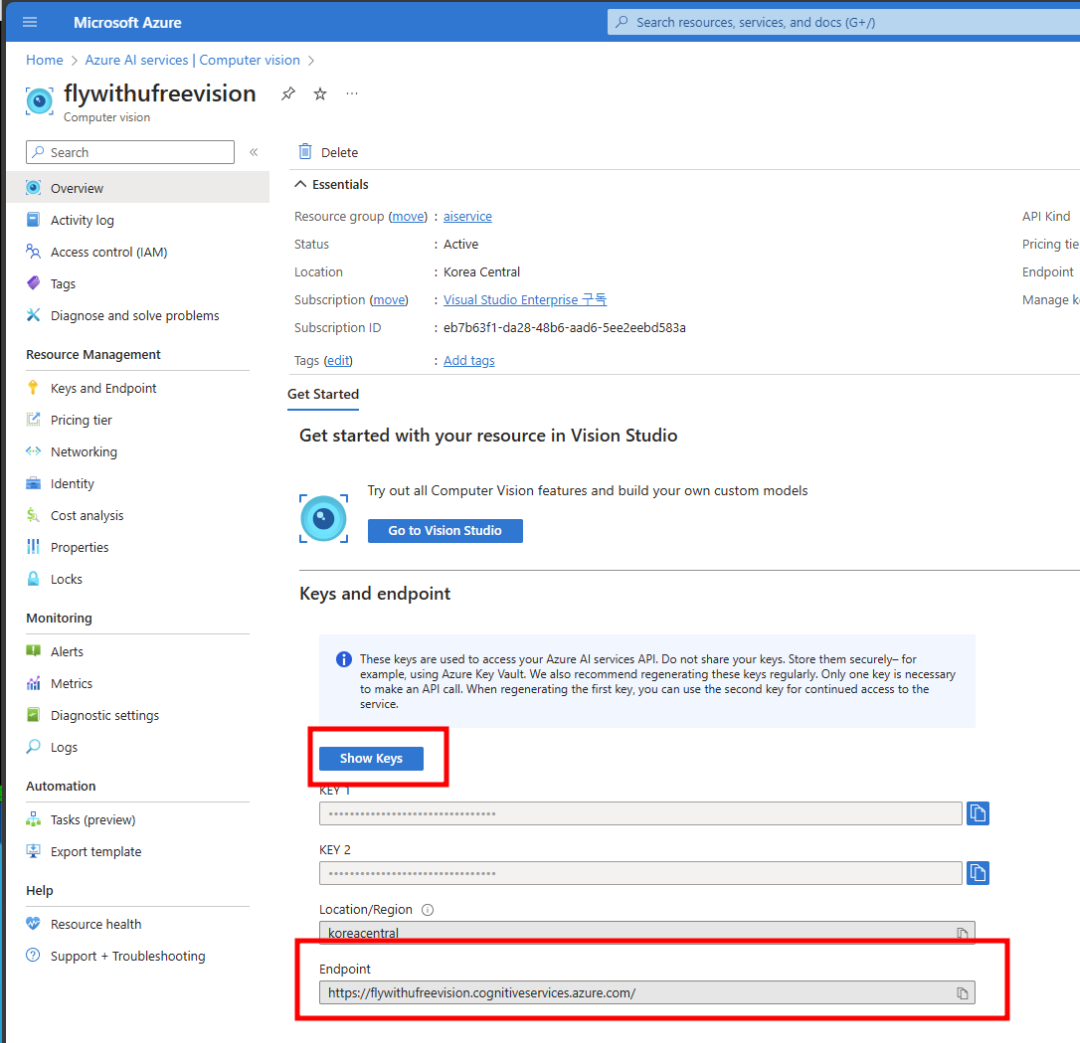
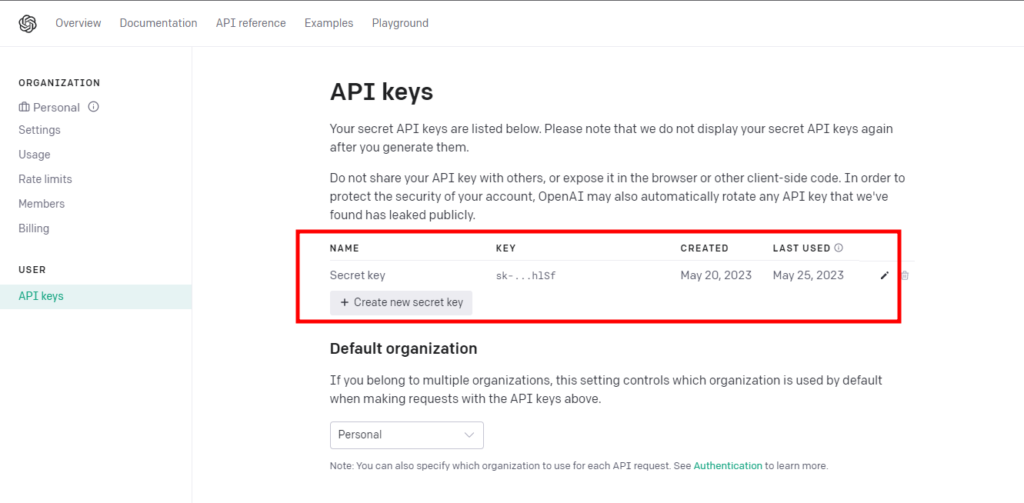
- Azure AI 서비스 생성
- 샘플코드
- 샘플코드 실행결과
024/05/01 20:19:08 ++++++++++++++++++++++++++++++++++++++++++++++++
2024/05/01 20:19:08 Download File
2024/05/01 20:19:09 ++++++++++++++++++++++++++++++++++++++++++++++++
2024/05/01 20:19:09 Image Tagging
*적절한 테그 제안
Tag: outdoor (Confidence: 0.99)
Tag: building (Confidence: 0.99)
Tag: sky (Confidence: 0.98)
2024/05/01 20:19:13 ++++++++++++++++++++++++++++++++++++++++++++++++
2024/05/01 20:19:13 Image Description
Description Tag: building
Description Tag: outdoor
Caption: an ancient city with many ruins with Colosseum in the background (Confidence: 0.34)
2024/05/01 20:19:14 ++++++++++++++++++++++++++++++++++++++++++++++++
2024/05/01 20:19:14 Object Detection
Object: kitchen appliance (Confidence: 0.50)
Object: computer keyboard (Confidence: 0.51)
Object: Laptop (Confidence: 0.85)
Parent Object: computer (Confidence: 0.85)
2024/05/01 20:19:15 ++++++++++++++++++++++++++++++++++++++++++++++++
2024/05/01 20:19:15 Landmark Analysis
Category: {building_ 0.83203125 0xc0001f79b0}
*사물인식Landmark: Eiffel Tower
======================== Brand
2024/05/01 20:19:16 Analyze - Brands
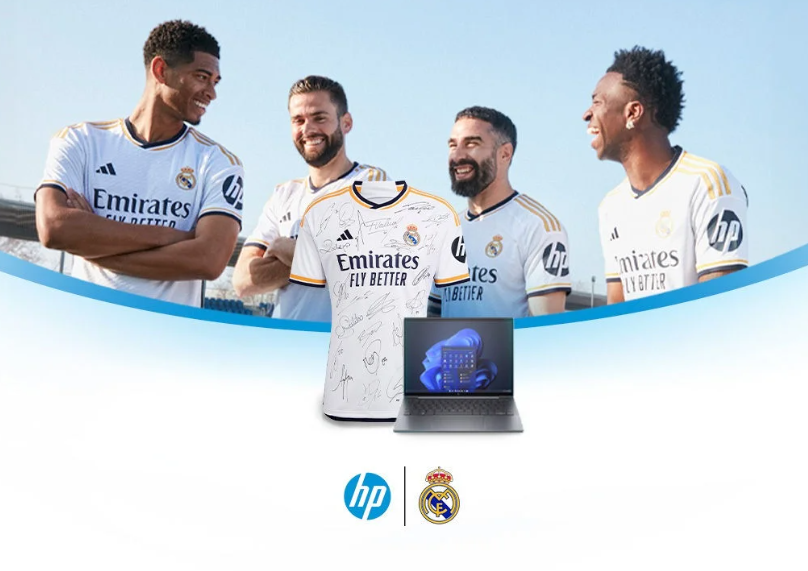
*Brand인식Brand : [{HP 0.603 {569 586 77 71}}]
Brand Tag: {person 0.987419068813324}
Brand Tag: {clothing 0.9757296442985535}
Brand Tag: {sky 0.9699560403823853}

- 샘플 이미지 – 이미지의 HP 로고를 인식 합니다.
- 라이브러리는 여기에(flywithu/azure-golang (github.com)) 있습니다. Code 역시 해당 사이트를 참고해도 되고, 아래를 참고 해도 됩니다.
- Library 환경 설정
go mod init azure-golang
go mod tidy
export VISION_KEY="YOURKEY"
go run- 실행 코드
package main

import (
	"github.com/flywithu/azure-golang"
	"fmt"
	"log"
	"os"
	"net/http"
	"io"

)

func main() {
	VISION_ENDPOINT := "https://flywithufreevision.cognitiveservices.azure.com"
	VISION_KEY := os.Getenv("VISION_KEY")

	filePath:="temp.jpg"
	// URLs for image analysis
	landmarkImageURL := "https://raw.githubusercontent.com/Azure-Samples/cognitive-services-sample-data-files/master/ComputerVision/Images/landmark.jpg"
	kitchenImageURL := "https://learn.microsoft.com/en-us/azure/ai-services/computer-vision/images/windows-kitchen.jpg"
	eiffelTowerImageURL := "https://upload.wikimedia.org/wikipedia/commons/thumb/d/d4/Eiffel_Tower_20051010.jpg/1023px-Eiffel_Tower_20051010.jpg"
	redShirtLogoImageURL := "https://publish-p47754-e237306.adobeaemcloud.com/adobe/dynamicmedia/deliver/dm-aid--08fdf594-c963-43c8-b686-d4ba06727971/noticia_madridistas_hp.app.png?preferwebp=true&width=1440"

	client := vision.ComputerVisionClient(VISION_ENDPOINT, VISION_KEY)

	log.Println("++++++++++++++++++++++++++++++++++++++++++++++++")
	log.Println("Download File")
	resp, err := http.Get(landmarkImageURL)
	if err != nil {
		panic(err)
	}
	defer resp.Body.Close()

	out, err := os.Create(filePath)
	if err != nil {
		panic(err)
	}
	defer out.Close()

	_, err = io.Copy(out, resp.Body)
	if err != nil {
		panic(err)
	}


	// Tagging an image
	log.Println("++++++++++++++++++++++++++++++++++++++++++++++++")

	log.Println("Image Tagging")
	tags, err := client.GetImageTags(filePath)
	if err != nil {
		log.Fatalf("Failed to get image tags: %v", err)
	}
	for i, tag := range tags.Tags {
		if i >= 3 { break }
		fmt.Printf("Tag: %s (Confidence: %.2f)\n", tag.Name, tag.Confidence)
	}

	// Describing an image
	log.Println("++++++++++++++++++++++++++++++++++++++++++++++++")

	log.Println("Image Description")
	description, err := client.GetImageDesc(filePath)
	if err != nil {
		log.Fatalf("Failed to get image description: %v", err)
	}
	for i, tag := range description.Description.Tags {
		if i >= 3 { break }
		fmt.Printf("Description Tag: %s\n", tag)
	}
	for i, caption := range description.Description.Captions {
		if i >= 3 { break }
		fmt.Printf("Caption: %s (Confidence: %.2f)\n", caption.Text, caption.Confidence)
	}

	// Object Detection
	log.Println("++++++++++++++++++++++++++++++++++++++++++++++++")
	log.Println("Object Detection")
	objects, err := client.GetImageObject(kitchenImageURL)
	if err != nil {
		log.Fatalf("Failed to detect objects: %v", err)
	}
	for i, obj := range objects.Objects {
		if i >= 3 { break }
		fmt.Printf("Object: %s (Confidence: %.2f)\n", obj.ObjectInfo.ObjectName, obj.ObjectInfo.Confidence)
		if obj.Parent != nil {
			fmt.Printf("Parent Object: %s (Confidence: %.2f)\n", obj.Parent.ObjectName, obj.Parent.Confidence)
		}
	}

	// Analyzing image for landmarks
	log.Println("++++++++++++++++++++++++++++++++++++++++++++++++")

	log.Println("Landmark Analysis")
	landmarks, err := client.GetImageAnalyze(eiffelTowerImageURL)
	if err != nil {
		fmt.Printf("Failed to analyze landmarks: %v", err)
	}
	for i, cat := range landmarks.Categories {
		if i >= 3 { break }
		fmt.Printf("Category: %v\n", cat)
		if cat.Detail != nil && len(cat.Detail.Landmarks) > 0 {
			fmt.Printf("Landmark: %v\n", cat.Detail.Landmarks[0].Name)
		}
	}

	// Analyzing brands
	log.Println("Analyze - Brands")
	brands, err := client.GetImageAnalyze(redShirtLogoImageURL)
	if err != nil {
		fmt.Printf("Failed to analyze brands: %v", err)
	}
	fmt.Printf("Brand : %v \n",brands.Brands)
	for i, tag := range brands.Tags {
		if i >= 3 { break }
		fmt.Printf("Brand Tag: %v \n", tag)
	}
}
I recently switched my photo organization tool from Piwigo to PhotoPrism. While Piwigo is a very good application, I found PhotoPrism’s modern UI and AI-powered photo capabilities appealing. PhotoPrism is developed in Golang and can be utilized with various languages through its REST API. However, since many examples are in Golang, I decided to use that. As it was my first time using Golang, I wrote libraries and samples with ChatGPT guidance.
Adding tags with Azure AI and uploading photos to PhotoPrims was the goal, and the reason for using Azure AI is that it offers free usage, which is sufficient for personal use.
- Creating Azure AI Service
- Sample code
- Execution Result
024/05/01 20:19:08 ++++++++++++++++++++++++++++++++++++++++++++++++Suggested Tags
2024/05/01 20:19:08 Download File
2024/05/01 20:19:09 ++++++++++++++++++++++++++++++++++++++++++++++++
2024/05/01 20:19:09 Image Tagging
*Tag: outdoor (Confidence: 0.99)Recognized the landmark
Tag: building (Confidence: 0.99)
Tag: sky (Confidence: 0.98)
2024/05/01 20:19:13 ++++++++++++++++++++++++++++++++++++++++++++++++
2024/05/01 20:19:13 Image Description
Description Tag: building
Description Tag: outdoor
Caption: an ancient city with many ruins with Colosseum in the background (Confidence: 0.34)
2024/05/01 20:19:14 ++++++++++++++++++++++++++++++++++++++++++++++++
2024/05/01 20:19:14 Object Detection
Object: kitchen appliance (Confidence: 0.50)
Object: computer keyboard (Confidence: 0.51)
Object: Laptop (Confidence: 0.85)
Parent Object: computer (Confidence: 0.85)
2024/05/01 20:19:15 ++++++++++++++++++++++++++++++++++++++++++++++++
2024/05/01 20:19:15 Landmark Analysis
Category: {building_ 0.83203125 0xc0001f79b0}
*Landmark: Eiffel TowerRecognized the Brand
======================== Brand
2024/05/01 20:19:16 Analyze - Brands
*Brand : [{HP 0.603 {569 586 77 71}}]
Brand Tag: {person 0.987419068813324}
Brand Tag: {clothing 0.9757296442985535}
Brand Tag: {sky 0.9699560403823853}
- Sample Image – Recognized the HP logo in the image.
- The library and code can be found here(flywithu/azure-golang (github.com) , or refer to the following.
- Setting the Library environment
go mod init azure-golang
go mod tidy
export VISION_KEY="YOURKEY"
go run- Golang code
package main

import (
	"github.com/flywithu/azure-golang"
	"fmt"
	"log"
	"os"
	"net/http"
	"io"

)

func main() {
	VISION_ENDPOINT := "https://flywithufreevision.cognitiveservices.azure.com"
	VISION_KEY := os.Getenv("VISION_KEY")

	filePath:="temp.jpg"
	// URLs for image analysis
	landmarkImageURL := "https://raw.githubusercontent.com/Azure-Samples/cognitive-services-sample-data-files/master/ComputerVision/Images/landmark.jpg"
	kitchenImageURL := "https://learn.microsoft.com/en-us/azure/ai-services/computer-vision/images/windows-kitchen.jpg"
	eiffelTowerImageURL := "https://upload.wikimedia.org/wikipedia/commons/thumb/d/d4/Eiffel_Tower_20051010.jpg/1023px-Eiffel_Tower_20051010.jpg"
	redShirtLogoImageURL := "https://publish-p47754-e237306.adobeaemcloud.com/adobe/dynamicmedia/deliver/dm-aid--08fdf594-c963-43c8-b686-d4ba06727971/noticia_madridistas_hp.app.png?preferwebp=true&width=1440"

	client := vision.ComputerVisionClient(VISION_ENDPOINT, VISION_KEY)

	log.Println("++++++++++++++++++++++++++++++++++++++++++++++++")
	log.Println("Download File")
	resp, err := http.Get(landmarkImageURL)
	if err != nil {
		panic(err)
	}
	defer resp.Body.Close()

	out, err := os.Create(filePath)
	if err != nil {
		panic(err)
	}
	defer out.Close()

	_, err = io.Copy(out, resp.Body)
	if err != nil {
		panic(err)
	}


	// Tagging an image
	log.Println("++++++++++++++++++++++++++++++++++++++++++++++++")

	log.Println("Image Tagging")
	tags, err := client.GetImageTags(filePath)
	if err != nil {
		log.Fatalf("Failed to get image tags: %v", err)
	}
	for i, tag := range tags.Tags {
		if i >= 3 { break }
		fmt.Printf("Tag: %s (Confidence: %.2f)\n", tag.Name, tag.Confidence)
	}

	// Describing an image
	log.Println("++++++++++++++++++++++++++++++++++++++++++++++++")

	log.Println("Image Description")
	description, err := client.GetImageDesc(filePath)
	if err != nil {
		log.Fatalf("Failed to get image description: %v", err)
	}
	for i, tag := range description.Description.Tags {
		if i >= 3 { break }
		fmt.Printf("Description Tag: %s\n", tag)
	}
	for i, caption := range description.Description.Captions {
		if i >= 3 { break }
		fmt.Printf("Caption: %s (Confidence: %.2f)\n", caption.Text, caption.Confidence)
	}

	// Object Detection
	log.Println("++++++++++++++++++++++++++++++++++++++++++++++++")
	log.Println("Object Detection")
	objects, err := client.GetImageObject(kitchenImageURL)
	if err != nil {
		log.Fatalf("Failed to detect objects: %v", err)
	}
	for i, obj := range objects.Objects {
		if i >= 3 { break }
		fmt.Printf("Object: %s (Confidence: %.2f)\n", obj.ObjectInfo.ObjectName, obj.ObjectInfo.Confidence)
		if obj.Parent != nil {
			fmt.Printf("Parent Object: %s (Confidence: %.2f)\n", obj.Parent.ObjectName, obj.Parent.Confidence)
		}
	}

	// Analyzing image for landmarks
	log.Println("++++++++++++++++++++++++++++++++++++++++++++++++")

	log.Println("Landmark Analysis")
	landmarks, err := client.GetImageAnalyze(eiffelTowerImageURL)
	if err != nil {
		fmt.Printf("Failed to analyze landmarks: %v", err)
	}
	for i, cat := range landmarks.Categories {
		if i >= 3 { break }
		fmt.Printf("Category: %v\n", cat)
		if cat.Detail != nil && len(cat.Detail.Landmarks) > 0 {
			fmt.Printf("Landmark: %v\n", cat.Detail.Landmarks[0].Name)
		}
	}

	// Analyzing brands
	log.Println("Analyze - Brands")
	brands, err := client.GetImageAnalyze(redShirtLogoImageURL)
	if err != nil {
		fmt.Printf("Failed to analyze brands: %v", err)
	}
	fmt.Printf("Brand : %v \n",brands.Brands)
	for i, tag := range brands.Tags {
		if i >= 3 { break }
		fmt.Printf("Brand Tag: %v \n", tag)
	}
}


Leave a Reply