얼마전에 사진 정리 도구를 Piwigo에서 PhotoPrism으로 변경했습니다. Piwigo는 매우 좋은 어플리케이션이지만, PhotoPrism의 현대적인 느낌과 AI를 이용한 사진 분류기능이 매력적입니다. PhotoPrism은 Golang으로 개발되어 있으며, REST API를 통해 다양한 프로그래밍 언어로 활용할 수 있습니다. (Browse Your Life in Pictures – PhotoPrism). 그러나 여러 예시가 Golang이라 그것을 활용해 보았습니다. Golang은 처음이로 ChatGPT를 이용해서 Library와 Sample을 만들었습니다.
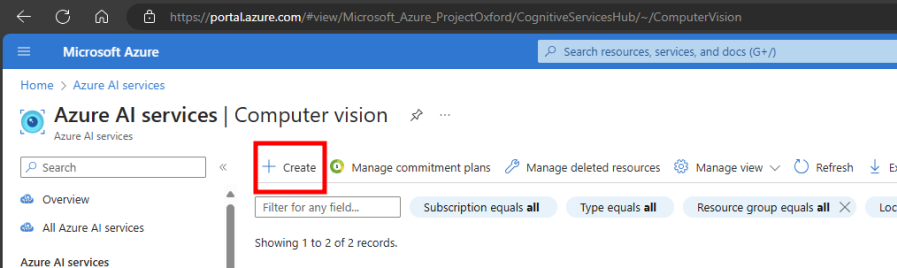
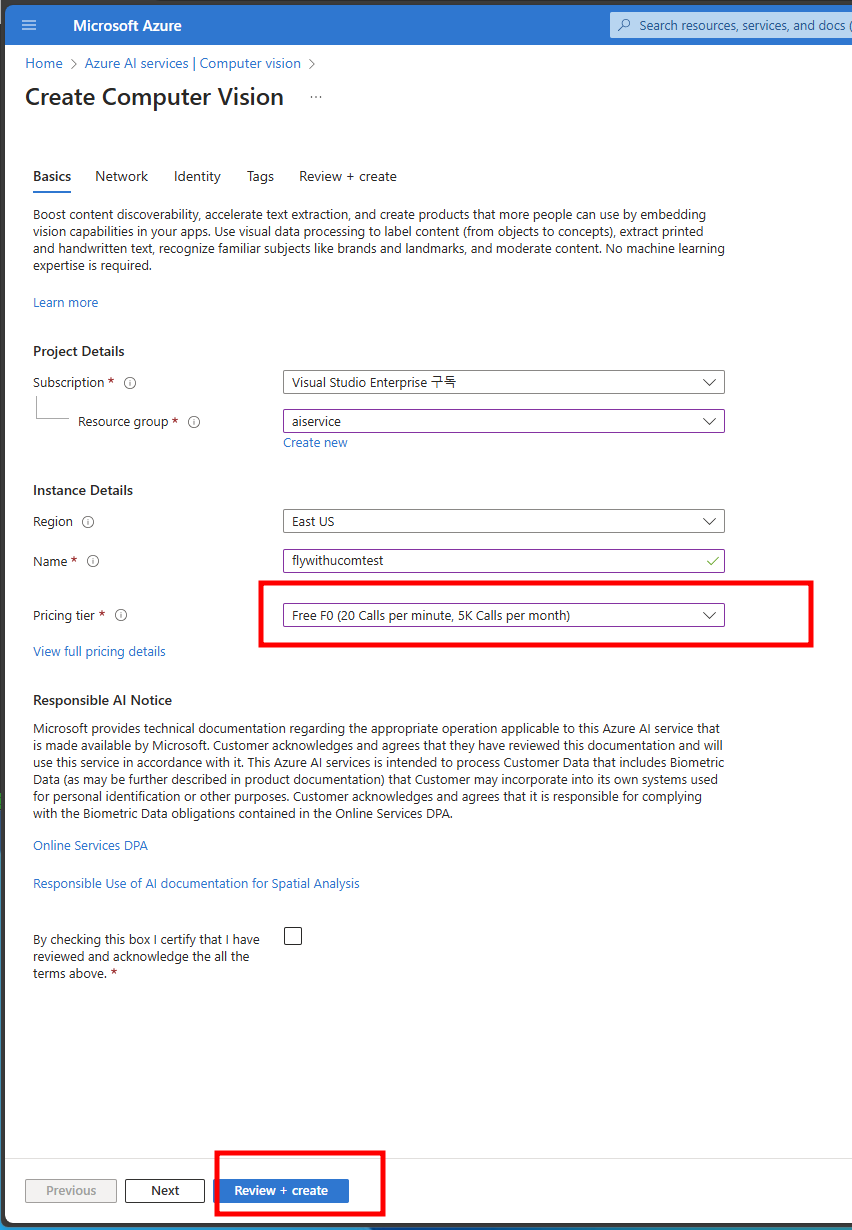
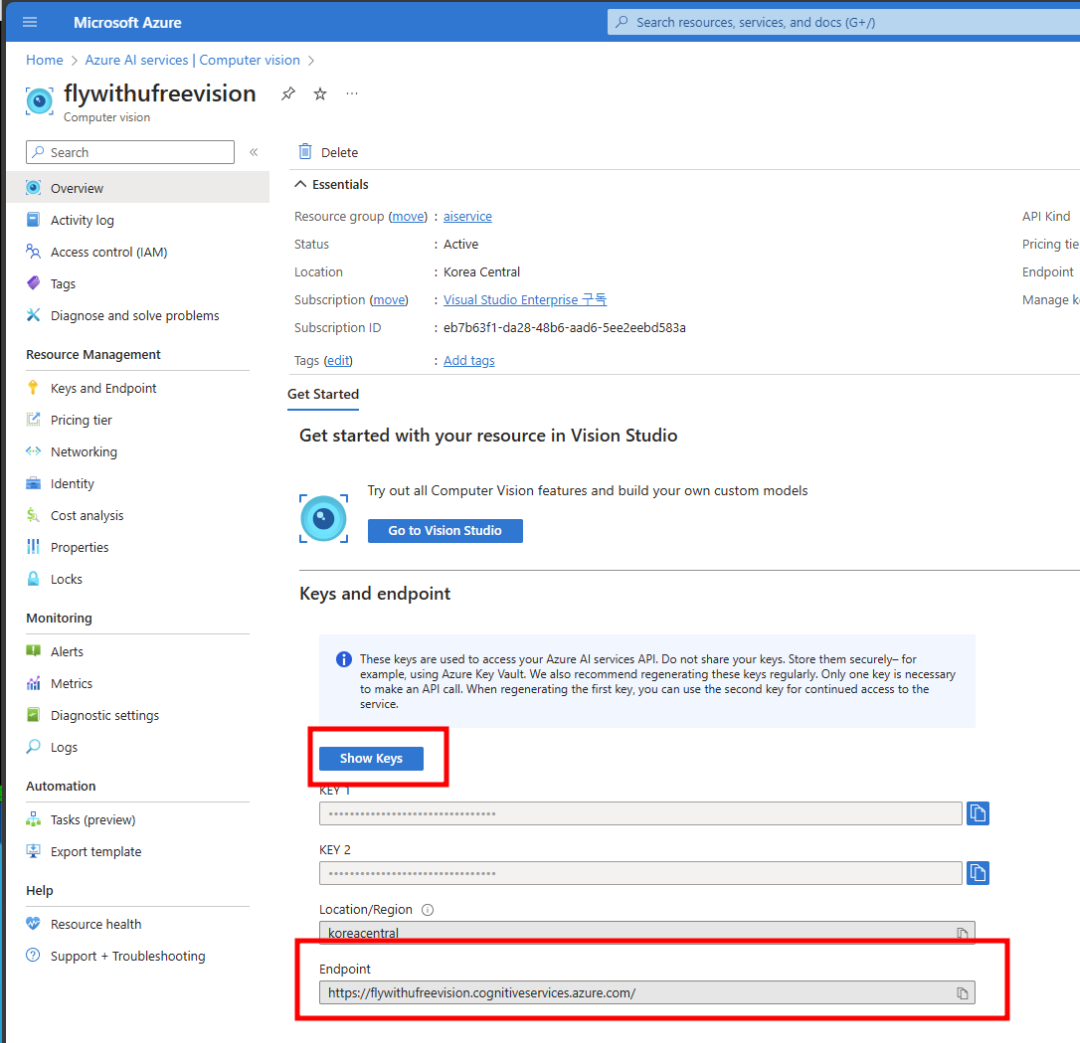
AzureAI를 사용해 태그를 추가하고, Piwigo의 사진을 PhotoPrism에 업로드 하는 것이 골이 었고, AzureAI를 사용한 이유는 일정범위(개인용으로 충분한)에서 무료 사용기 가능하다는 점입니다.
go mod init azure-golang
go mod tidy
export VISION_KEY="YOURKEY"
go run
실행 코드
package main

import (
	"github.com/flywithu/azure-golang"
	"fmt"
	"log"
	"os"
	"net/http"
	"io"

)

func main() {
	VISION_ENDPOINT := "https://flywithufreevision.cognitiveservices.azure.com"
	VISION_KEY := os.Getenv("VISION_KEY")

	filePath:="temp.jpg"
	// URLs for image analysis
	landmarkImageURL := "https://raw.githubusercontent.com/Azure-Samples/cognitive-services-sample-data-files/master/ComputerVision/Images/landmark.jpg"
	kitchenImageURL := "https://learn.microsoft.com/en-us/azure/ai-services/computer-vision/images/windows-kitchen.jpg"
	eiffelTowerImageURL := "https://upload.wikimedia.org/wikipedia/commons/thumb/d/d4/Eiffel_Tower_20051010.jpg/1023px-Eiffel_Tower_20051010.jpg"
	redShirtLogoImageURL := "https://publish-p47754-e237306.adobeaemcloud.com/adobe/dynamicmedia/deliver/dm-aid--08fdf594-c963-43c8-b686-d4ba06727971/noticia_madridistas_hp.app.png?preferwebp=true&width=1440"

	client := vision.ComputerVisionClient(VISION_ENDPOINT, VISION_KEY)

	log.Println("++++++++++++++++++++++++++++++++++++++++++++++++")
	log.Println("Download File")
	resp, err := http.Get(landmarkImageURL)
	if err != nil {
		panic(err)
	}
	defer resp.Body.Close()

	out, err := os.Create(filePath)
	if err != nil {
		panic(err)
	}
	defer out.Close()

	_, err = io.Copy(out, resp.Body)
	if err != nil {
		panic(err)
	}


	// Tagging an image
	log.Println("++++++++++++++++++++++++++++++++++++++++++++++++")

	log.Println("Image Tagging")
	tags, err := client.GetImageTags(filePath)
	if err != nil {
		log.Fatalf("Failed to get image tags: %v", err)
	}
	for i, tag := range tags.Tags {
		if i >= 3 { break }
		fmt.Printf("Tag: %s (Confidence: %.2f)\n", tag.Name, tag.Confidence)
	}

	// Describing an image
	log.Println("++++++++++++++++++++++++++++++++++++++++++++++++")

	log.Println("Image Description")
	description, err := client.GetImageDesc(filePath)
	if err != nil {
		log.Fatalf("Failed to get image description: %v", err)
	}
	for i, tag := range description.Description.Tags {
		if i >= 3 { break }
		fmt.Printf("Description Tag: %s\n", tag)
	}
	for i, caption := range description.Description.Captions {
		if i >= 3 { break }
		fmt.Printf("Caption: %s (Confidence: %.2f)\n", caption.Text, caption.Confidence)
	}

	// Object Detection
	log.Println("++++++++++++++++++++++++++++++++++++++++++++++++")
	log.Println("Object Detection")
	objects, err := client.GetImageObject(kitchenImageURL)
	if err != nil {
		log.Fatalf("Failed to detect objects: %v", err)
	}
	for i, obj := range objects.Objects {
		if i >= 3 { break }
		fmt.Printf("Object: %s (Confidence: %.2f)\n", obj.ObjectInfo.ObjectName, obj.ObjectInfo.Confidence)
		if obj.Parent != nil {
			fmt.Printf("Parent Object: %s (Confidence: %.2f)\n", obj.Parent.ObjectName, obj.Parent.Confidence)
		}
	}

	// Analyzing image for landmarks
	log.Println("++++++++++++++++++++++++++++++++++++++++++++++++")

	log.Println("Landmark Analysis")
	landmarks, err := client.GetImageAnalyze(eiffelTowerImageURL)
	if err != nil {
		fmt.Printf("Failed to analyze landmarks: %v", err)
	}
	for i, cat := range landmarks.Categories {
		if i >= 3 { break }
		fmt.Printf("Category: %v\n", cat)
		if cat.Detail != nil && len(cat.Detail.Landmarks) > 0 {
			fmt.Printf("Landmark: %v\n", cat.Detail.Landmarks[0].Name)
		}
	}

	// Analyzing brands
	log.Println("Analyze - Brands")
	brands, err := client.GetImageAnalyze(redShirtLogoImageURL)
	if err != nil {
		fmt.Printf("Failed to analyze brands: %v", err)
	}
	fmt.Printf("Brand : %v \n",brands.Brands)
	for i, tag := range brands.Tags {
		if i >= 3 { break }
		fmt.Printf("Brand Tag: %v \n", tag)
	}
}
I recently switched my photo organization tool from Piwigo to PhotoPrism. While Piwigo is a very good application, I found PhotoPrism’s modern UI and AI-powered photo capabilities appealing. PhotoPrism is developed in Golang and can be utilized with various languages through its REST API. However, since many examples are in Golang, I decided to use that. As it was my first time using Golang, I wrote libraries and samples with ChatGPT guidance.
Adding tags with Azure AI and uploading photos to PhotoPrims was the goal, and the reason for using Azure AI is that it offers free usage, which is sufficient for personal use.
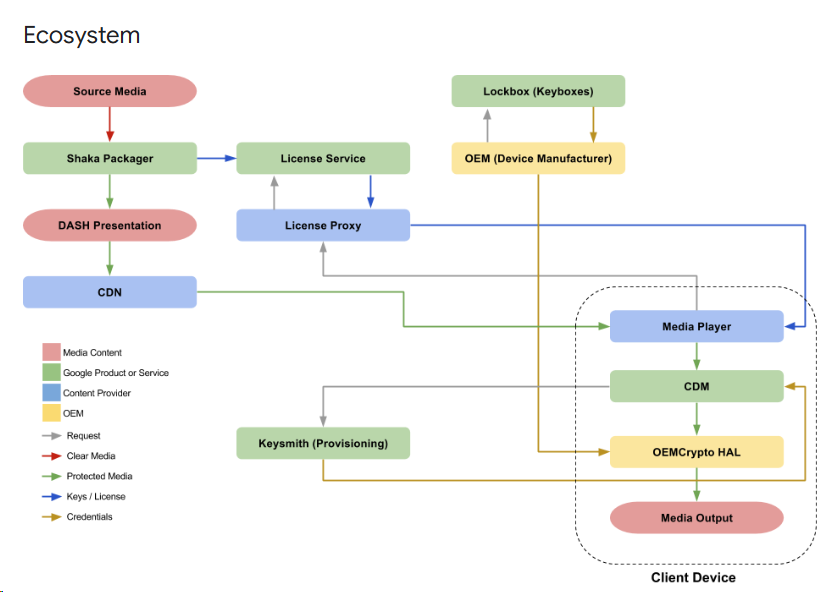
Android의 CTS를 TC를 확인하면서, DRM항목 중 Clearkey TC에 관심이 생겼습니다. DRM은 디지털 콘텐츠의 무단 복제를 방지 하는 기술로, 저작권 보호에 핵심적인 역할을 합니다. 이 기술에 실제로 어떻게 작동하는지 궁금해서 다음과 같은 리소스도 참고 했습니다.
Clearkey는 간단하고 비용 효율적인 DRM으로, 주로 보안 요구사항이 낮은 콘텐츠에 적용됩니다. 반면 Google에서 개발한 Widevine은 훨씬 높은 보안을 제공합니다. Widevine은 세가지 보안 수준(L1,L2,L3)를 가지며, 이는 HW와 SW사용 여부에 달라집니다. L1과 L2는 HW를 사용하여 보안을 강화하지만, L3는 소프트웨어만을 사용하고 보통 480p해상도 까지 지원 합니다.
Coupang Play의DRM
현재 OTT는 Netflix, Disney, Tving, CoupangPlay, youtube 를 구독 중입니다. 최근 Coupang Play가 가격인상을 하였기에, 향후에도 계속 사용할지 모르겠습니다. 그래서 권한이 있을때 확인 해보고자 했습니다.
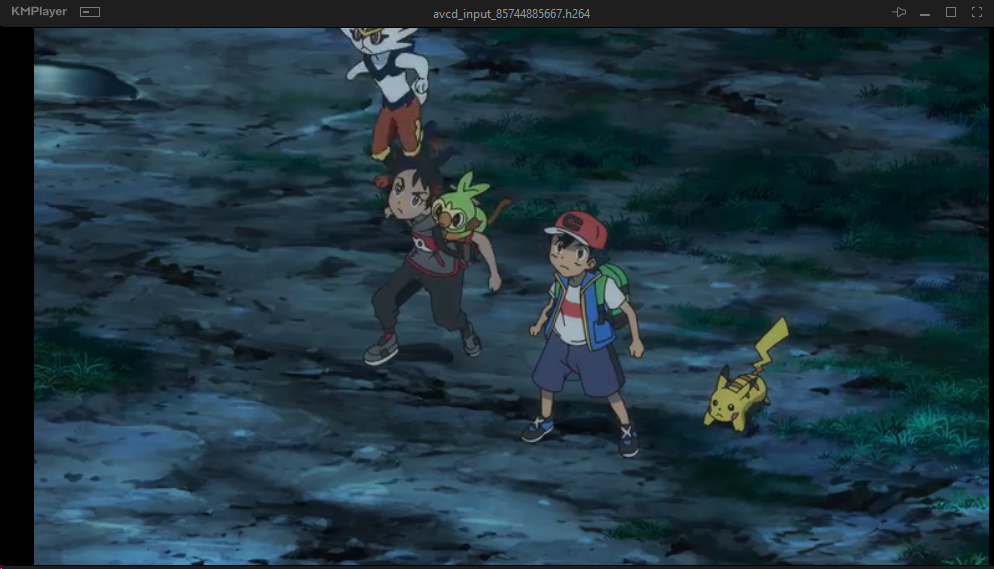
DRM 및 관련 자료를 찾는 사전 준비대비, 코덱 코드에 이미 DUMP 준비가 다 되어 있고, Define만 살렸더니 실험해보려던거가 한번에 되어서 좀 허망함이 있었습니다.
그러나 이번에 DRM의 구조 이해와 미디어쪽을 알게 되었습니다. 이론적으로는 FakeCodec과 같은 사용자 정의 코덱을 만들면 DRM 보호 데이터를 덤프 할수 있음을 확인 했습니다.
DRM으로 보호된 것을 사적 복사를 넘어선 제 3자에게 공유하는 것은 금지되어 있습니다. 그리고 다른 ID로 덤프해서 비교해보면 확실하겠지만, 아마 워터마크가 있을 것이고 이를 통한 추적도 가능 할것 입니다. 이러한 워터마크의 제거를 하려면 인코딩과 디코딩을 반복해서 해야 하고, 그러면 화질 저하가 발생하기 때문에 이것도 방법은 아닙니다..
English
Motivation
While stuying the Android CTS, I became interested in the ClearKey TC within DRM. DRM is a protective technology designed to prevent copying. I’ve reviewd below items.
DRM stands for ‘Digital Rights Management’ , a technology designed to prevent unauthrozied copying and distribution of digital content. And only authorized users recevied the key to access it.
Clearkey is a simple and cost efficient DRM solution, used for content with low security requirments. On the other hand, Widevine, developed by Google, offers much higher security. Widevine has three levels of security(L1,L2,L3) that depend on whether HW or SW is used. L1 and L2 enhances security by HW, L3 uses only SW and typically supports up to 480p resolution.
Coupang Play with DRM
With the recent price increase at Coupang Play, I’m unsure if I’ll continue my subscription. Therefore I hope to thoroughly invetigate the service while I sill have access.
Initially, I intened to experiment only with the ClearKey method. as studying Widevine seemd too challenging. However, rather than giving up, I decied to shift my focus to chekcing if video dumping was possible.
This is the Widevine architecture and lower-right HAL, known s OEMCrypto HAL, decrypts the data and tranfers it to Media Out.
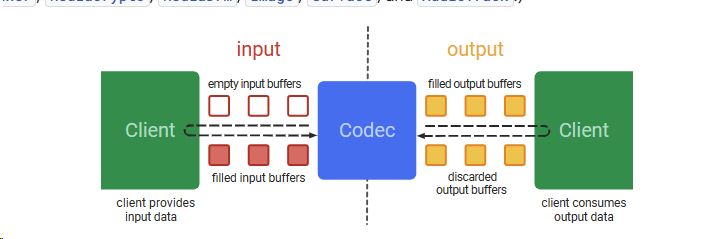
This is the codec architecture. The decrypted data is decoded by the codec and then displayed on screen. I may not be able to decrypt Widevine, I colud intercept and save the input to obtain the decrypted data.
After examing the codec section , I modified the following part to make it operational .
이번 포스트는 MNIST 데이터셋입니다. MNIST는 머신러닝과 컴퓨터 비전 분야에서 ‘Hello world’와 같은 존재 입니다. 이처럼 광범위하게 사용되는 만큼, 다양한 예제와 구현 방법이 널리 알려져 있습니다. 최근에 CPP로 된 MNIST를 돌려 보다가, 기존 python 보다 훨씬 빠른거 같은 느낌이 들어서 실제적인 시간을 측정해 보았습니다.
사실 python 은 GIL, 싱글쓰레드, 인터프리터, 동적 타이핑등의 이유로 CPP보다 느릴수 밖에 없습니다. 그러나 PyTorch는 많은 부분이 저수준 언어를 랩핑하는 것으로 알고 있었기에 예상보다 큰 성능차이를 보이는 결과에 대해서 상당한 의구심이 있습니다. 테스트가 잘못 되었을수도 있기 때문에, 잘못된 점을 알려 주시면 다시 확인 해보겠습니다.
테스트 결과를 보면 DataLoader와 Log Print 에서 수치적으로 큰 차이가 납니다. Python 이 Non-Blocking 으로 I/O처리는 하지만 아무래도 성능 저하가 있는것 같습니다. Log Print 의 경우는 화면에 비출력 해서, DataLoader는 속도를 최적화한 다른 API로 변경이 가능할것으로 보입니다. GPU로 복사하는 시간은 거의 동일한 것으로 봐서는, Python의 관여가 적으면 성능은 유사한것 같습니다.
가장 중요한 학습 부분에서, 초기화 – 학습 의 과정에서 아래 예시에서는 절대적 시간 차이는 적지만, %로 보면은 큰 차이를 보입니다. 이 수치와 학습 모델의 크기도 나중에 비교할 필요가 있습니다. 만약 학습 모델의 크기가 클수록 이 차이가 커진다면, PoC후 튜닝 및 상용화는 언어를 변경하는 것도 고려가 필요해 보입니다.
테스트 수행했던 코드는 colab 에 올렸습니다. 성능차이가 심한것이 아무래도 이상한데 잘못된 점이 있으면 알려 주길 부탁 드립니다. 동일한(유사한)결과를 위해 Colab 결과만 올립니다.
GPU 사용량을 추적할수 있었던 로컬 테스트 결과를 첨언하자면 GPU 사용률에서는 CPP가 월등히 높았습니다. 그러나 CPU만을 이용한 학습의 경우, CPU는 100%에 가까운 사용률을 보이나, GPU를 이용한 학습의 경우는 Cpp의 경우 50%, Python의 경우 DataLoader를 멀티로 돌릴때 30% 사용률을 보였습니다. 그래서 동시에 여러 잡을 돌려서 GPU를 100%까지 사용할수 있다면, 단위시간당 처리량은 cpp와 python이 같을수 있습니다. 이 부분은 더 실험이 필요해 보입니다.
다만 앙상블과 같은 모델을 돌려서 한개의 결과를 뽑는다고 보았을때는, CPP를 이용하는 것이 학습과 결과에 유리 해 보입니다.
각 단계별 설명은 다음과 같습니다. Total Time: 전체 수행 시간 Summed Time: 각 스텝별 수행시간의 합. (vs. Total : Main 프로그램이 도는데 걸리는 시간 제외) Step Count: 학습한 데이터 갯수(확인용) – 동일 수치로 두개의 모델의 일관성을 확인합니다. Data Loading: PyTorch API를 이용한 MNIST 데이터 loading 시간 – 시간 차이가 큰 부분입니다. 언어별 효율성의 차이를 알 수 있습니다. Copying TO GPU: 로딩한 데이터를 GPU로 복사 시간 – GPU 사용을 위한 데이터 복사 시간. 큰 차이 없음. Optimizer Init: 초기화 – 학습 시작전 초기화 입니다. %로 보면 큰 차이를 보입니다. Model Forward: 모델 순전파(입력 예측 생성). %로 보면 큰 차이를 보입니다. 모델의 크기에 따른 비교도 필요 합니다. Loss Calculation: 손실계산 Backward Pass: 역전파 (가중치 조정) Parameter Update: 가중치 업데이트 Progress Printing: Log 출력
The MNIST dataset is described as the ‘Hello World’ of Machine Learning and Computer Vision. It is widely used, with numerous examples and implementations available. Recently, I experimented with the MNIST implementation in C++, and it appeared to run faster than Python. So, I tried to check the actual time.
Python tends to be slower than C++ due to factors like the GIL, single-thread, Interpreted language, and dynamic typing. However, knowing that PyTorch wraps a lot of low-level language functionality, I expected the performance gap between C++ and Python to be minimal. But the significant differences I observed, especially in DataLoader and Log Print times, were curious. While Python used non-blocking I/O, it seems to incur some performance penalty. For log print, avoiding output to the screen and for DataLoader, using an optimized API could potentially improve performance. The time taken to copy data to the GPU was nearly identical, When Python’s involvement is minimal, the performance is similar.
In the important area of machine learning, particularly during initialization and training, the above time difference was small but proportionally significant. This indicates the need for further comparison, especially with larger size models. If bigger models make the performance gap larger, we might think about trying a different programming language before commercialization.
I’ve uploaded the test code to Colab. The significant performance difference seems unusual, so let me know of any potential mistakes. To maintain consistency, I’ve shared only the Colab results.
Additionally, I’ve observed GPU usage differences, with C++ utilizing the GPU more effectively than Python. When training solely on CPU, the usage was nearly 100%, but for C++ , the GPU usage was 50% and even lower for Python when trying with multi-threaded data loading. Perhaps maximizing GPU utilization with concurrent tasks could equalize C++ and Python’s performance. We need further investigation.
For ensemble models producing a single result, C++ seems to be more advantageous for machine learning tasks.
The table above provides a more detailed explanation of the time consumed at each step, and the full code is available at the provided URL.
테스트를 효율성을 위해서 emulator 작업 중이었는데, 이것도 중단하고 tmap도 다 삭제 했었습니다. 그러나 emulator는 필요한 분도 있을것 같아 이번에 정리해서 올립니다.
기능은 X86 AAOS(AOSP) emulator (AOSP11): 설정에 따라 phone 및 AAOS 모두 사용 가능 합니다. docker/config 를 aosp_car_x86_64-user 또는 sdk_phone_x86_64-user 로 수정하면 됩니다. arm -> x86 인터프리터 => 이 라이브러리로 arm전용 앱인 tmap도 설치 및 사용 가능. 수도권순환도로를 왔다 갔다 하는 GPS 값 Google Playstore 및 Korean IME 요렇게 있습니다.
참고로 AOSP9용으로도 x86/arm houdini library가 있는데, Tmap이 Android9(API28) 지원한다고는 적혀 있으나, 제가 테스트 했을떄는 API30 (AOSP10)용 API가 사용되는것으로 보였습니다. 실행하다 에러가 나는데 디버깅하다가 그냥 AOSP11로 업그레이드 했습니다.
VPN으로 연결하거나, 클라우드로 연결하기 또는 전용 솔루션 및 라우터 사용하기 입니다. 여기서는 가장 저렴하게 구축할수 있는 IPTime 공유기 두대로 VPN으로 묶어서 사용하는 방법을 설명하려고 합니다.
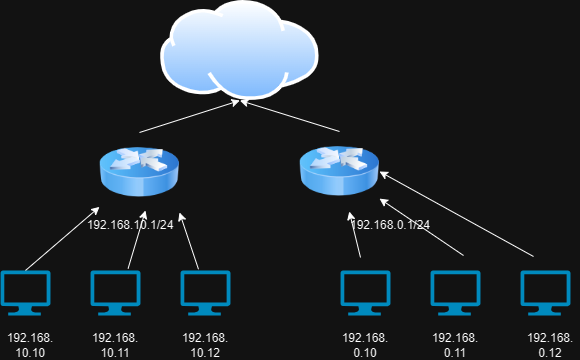
먼저 공유기의 IP대역은 서로 달라야 합니다. 아래 처럼 공유기 1은 192.168.10.1/24, 공유기2는 192.168.0.1/24 입니다. 그리고 각각이 인터넷으로 연결이 됩니다.
위와 같이 VPN 서버 설정, 또는 Wireguard 서버 설정을 합니다. Wireguard 서버 설정이 속도가 더 빠릅니다. 하단에 각 프로토콜별 속도 비교는 맨 하단을 참고 하세요.
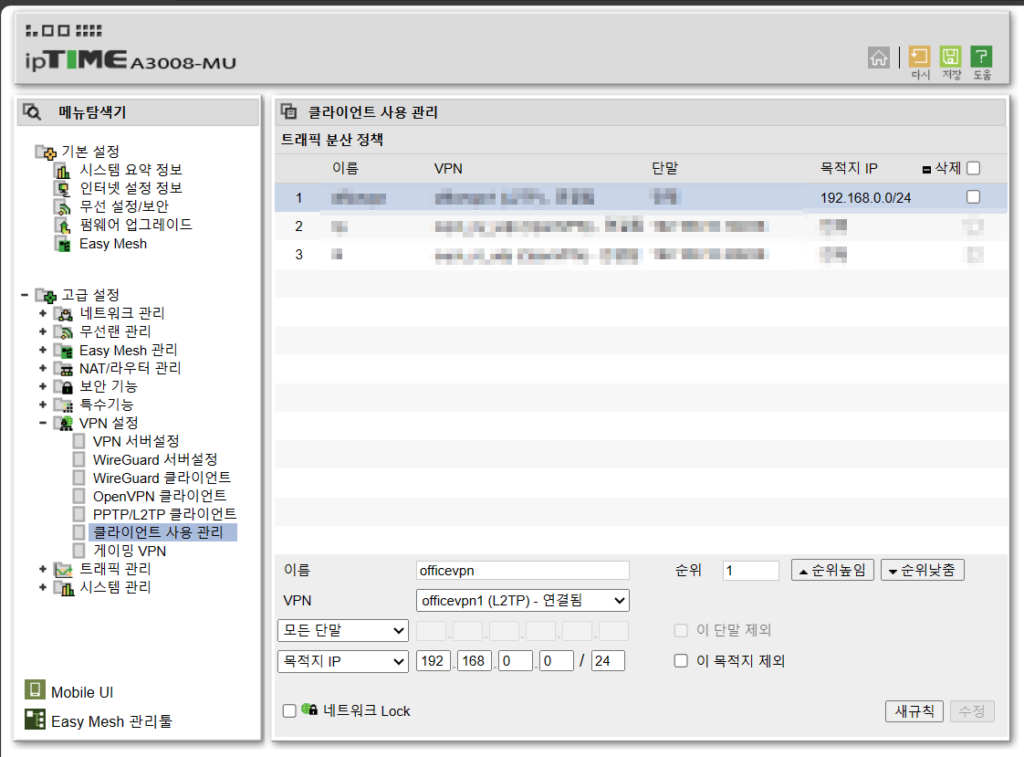
그다음 클라이언트 사용 관리에서 IP 라우팅을 설정해 줍니다. 192.168.0.1 공유기는 목적지 IP를 192.168.10.0/24 로 설정합니다. 반대로 192.168.10.1공유기는 목적지 IP를 192.168.0.0/24로 설정합니다. 이렇게 하면 기존 IP는 공유기를 타고 나가고, 다른 지역의 공유기는 목적지 IP를 타고 나갑니다.
아래와 같이 두 지점이 VPN으로 연결되서, IP 만으로 서로 접속이 됩니다. 두곳 중 어디서든 IP만으로 상대 지역에 접속이 됩니다.
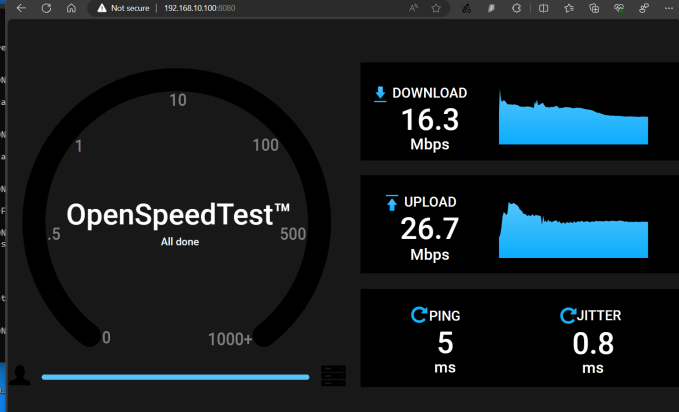
LT2P
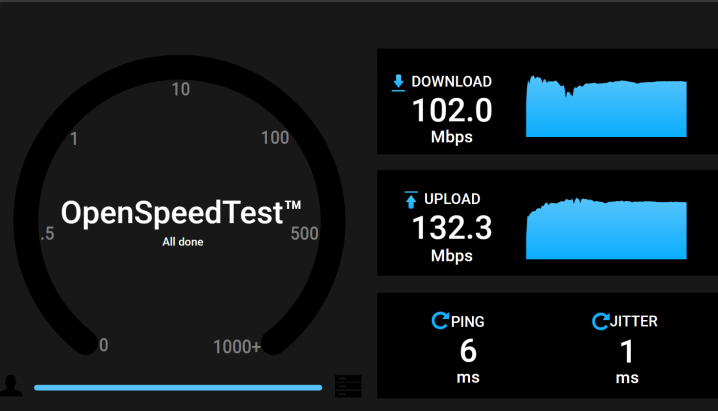
LT2P 속도 입니다. 16.3M / 26.7M 입니다.
WIREGUARD
WIREGUARD속도 입니다. 102M/132M
이와 같이 Ping은 1ms 차이나지만, 속도는 3X~4X 차이가 납니다. 그만큼 Wireguard가 속도면에서 훨씬 우수하기 때문에, 가능한 wireguard를 추천합니다. 그러나 속도 보다 안정성이 중요하다면 LT2P가 좋습니다. 아무래도 오래된 프로토콜이기 때문입니다.
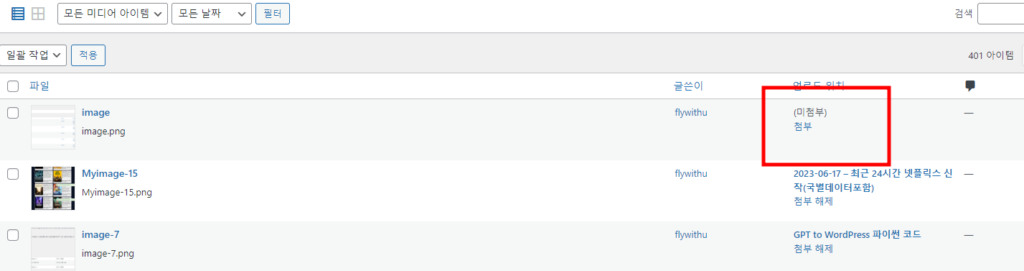
wordpress로 블로그를 올리고 미디어 파일을 올립니다. 그런데 미디어파일을 별도로 올리거나 하는 경우 아래와 같이 미디어 파일과 블로그의 글의 링크가 깨지는 경우가 있습니다.
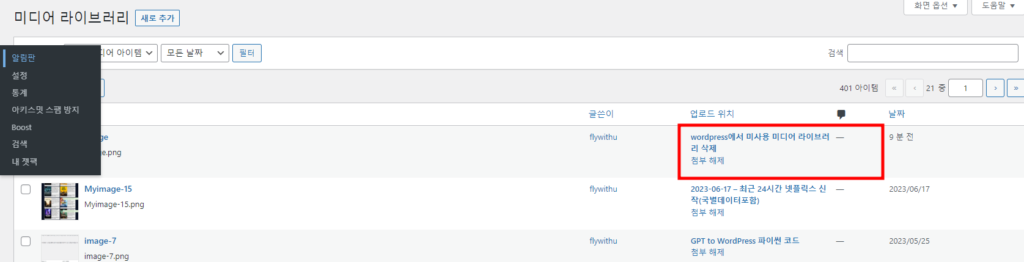
아래의 스크립트를 돌리면 이러한 글들을 미디어파일과 블로그 글을 링크로 연결 해줍니다.
# -*- encoding:utf8 -*-from curses.ascii import isdigit
from select import select
from turtle import Screen, isvisible
import requests
import random
from configparser import ConfigParser
from selenium import webdriver
from bs4 import BeautifulSoup
import sys
import time
from selenium.webdriver.common.by import By
from selenium.webdriver.common.keys import Keys
from selenium.webdriver.support import expected_conditions as EC
from selenium.webdriver.support.ui import WebDriverWait
from selenium.webdriver.chrome.service import Service
from webdriver_manager.chrome import ChromeDriverManager
import math
from selenium.webdriver.support.ui import Select
import logging
import os
from Screenshot import Screenshot_Clipping
from PIL import Image
from inspect import currentframe, getframeinfo
from urllib.request import Request, urlopen
from datetime import datetime,date,timedelta
from requests.auth import HTTPBasicAuth
import json
import base64, json, re, requests
def download_file(url, save_path):
    response = requests.get(url)

    if response.status_code == 200:
        with open(save_path, 'wb') as file:
            file.write(response.content)
        print(f"파일 다운로드 완료: {save_path}")
    else:
        print("파일 다운로드 실패")
from urllib.parse import urlparse

count = 0
for mymedia in mymedias:
    # myone = os.path.basename()
    myone =  urlparse(mymedia['guid']['rendered']).path
    print(myone)
    for post in myposts:
        content = post['content']['rendered']
        if myone in content:
            print(post['id'],mymedia['id'])
            attach_media_to_post(post['id'],mymedia['id'],baseurl,username,password)
2 responses to “wordpress에서 라이브러리와 블로그 링크”
크라잉포유
안녕하세요 그간 티맵 덕분에 잘쓰고있던 유저입니다~~요새 티맵 카테고리가 삭제되서 이제 더이상 업뎃을 안하는지요?이유가 있겠지만..아쉽네요..^^
최근 몇일동안 사이트 사용에 문제가 있었습니다. 예를들어 댓글이 작성이 안되는 문제였습니다. 그 이유는 웹호스팅 디스크 Full 때문이었습니다.
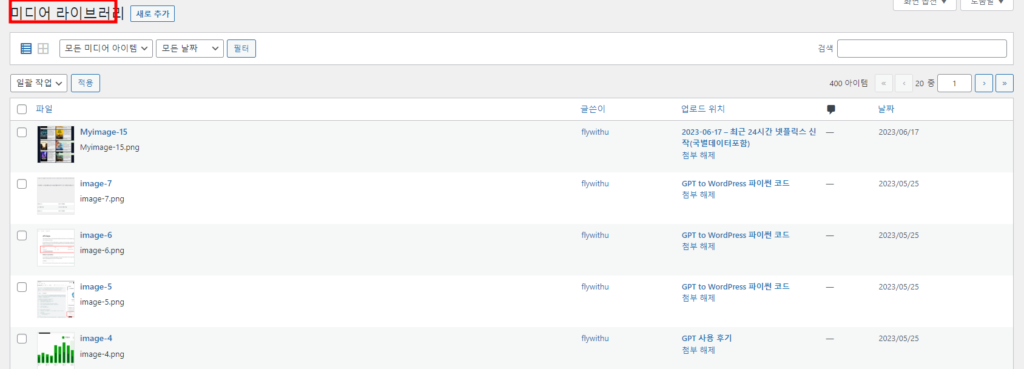
그동안 중복해서 올린 media 라이브러리가 많았는데, 사용하지 않는 미디어파일을 삭제 하는 노트북 파일 입니다.
파일명으로만 검색하기 때문에, 동일한 파일명으로 사용중일때는 있는 것으로 판단합니다. 즉 좀 더 보수적으로 판단 됩니다. 정확하게는 경로명까지 봐서 판단해야 하는데, 이거는 다음에 올린 다음 버젼에서 적용 되었습니다.
ID/PW 부분만 변경해서 사용하면 동작 할것 입니다.
# -*- encoding:utf8 -*-from curses.ascii import isdigit
from select import select
from turtle import Screen, isvisible
import requests
import random
from configparser import ConfigParser
from selenium import webdriver
from bs4 import BeautifulSoup
import sys
import time
from selenium.webdriver.common.by import By
from selenium.webdriver.common.keys import Keys
from selenium.webdriver.support import expected_conditions as EC
from selenium.webdriver.support.ui import WebDriverWait
from selenium.webdriver.chrome.service import Service
from webdriver_manager.chrome import ChromeDriverManager
import math
from selenium.webdriver.support.ui import Select
import logging
import os
from Screenshot import Screenshot_Clipping
from PIL import Image
from inspect import currentframe, getframeinfo
from urllib.request import Request, urlopen
from datetime import datetime,date,timedelta
from requests.auth import HTTPBasicAuth
import json
import base64, json, re, requests
mycontent=""
for post in myposts:
    content = post['content']['rendered']
    mycontent=mycontent+content
In [249]:
def save_text_to_file(text, file_path):
    with open(file_path, 'w') as file:
        file.write(text)

save_text_to_file(mycontent,"result.txt")
In [250]:
def download_file(url, save_path):
    response = requests.get(url)

    if response.status_code == 200:
        with open(save_path, 'wb') as file:
            file.write(response.content)
        print(f"파일 다운로드 완료: {save_path}")
    else:
        print("파일 다운로드 실패")
In [251]:
if 'Myimage-29.png' in mycontent:
    print("OK")
In [252]:
mymedia_hash=[]
count = 0
for mymedia in mymedias:
myone = os.path.basename(mymedia['guid']['rendered'])
if myone notin mycontent:
print(myone)
print(mymedia['guid']['rendered'])
print(mymedia['id'])
download_file(mymedia['guid']['rendered'],"data/"+myone)
deleteurl = baseurl+f"/media/{mymedia['id']}"
print(deleteurl)
count=count+1
data = {
'id': mymedia['id'],
'force': 1,
}
print(data)
res = requests.delete(deleteurl,headers=header,data=json.dumps(data))
print(res.status_code)
print(count)
tmpr5ze2f_a.png
https://www.flywithu.com/wp-content/uploads/2023/05/tmpr5ze2f_a.png
6831
파일 다운로드 완료: data/tmpr5ze2f_a.png
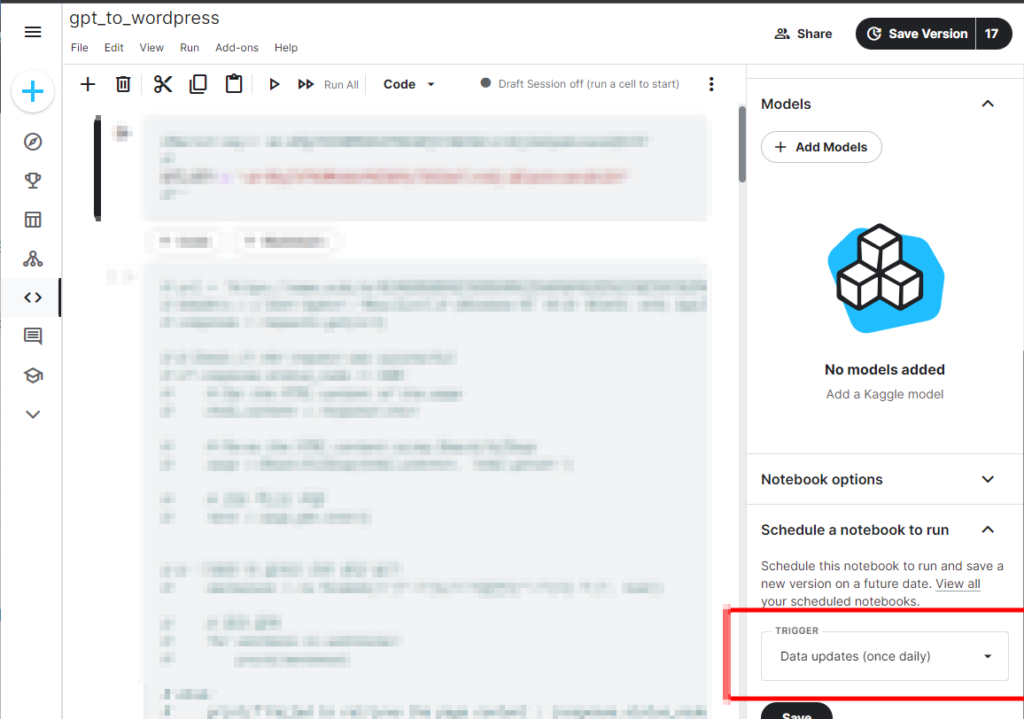
개발 환경은 Kaggle 서버 입니다. (www.kaggle.com) 여기의 장점은 스케줄링이 되서, 매일 한번씩 코드가 자동 실행 됩니다. 그것도 무료로! 스케줄링 설정은 아래와 작성한 파이썬에 대해서 설정해줍니다. 그러면 UTC 0 (9:00AM KST)에 실행이 됩니다.
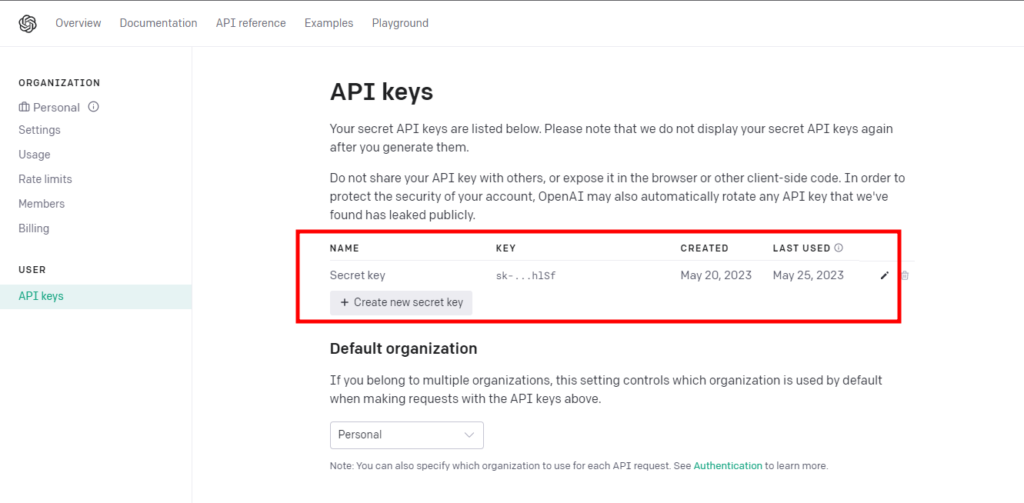
사실 코드가 별로 길지도 않아서.. 먼저 OpenAI의 API Key를 가져 옵니다. (https://platform.openai.com/account/api-keys)
아래와 같이 글을 작성해주는데, GPT도 알고 있던 시대이니, 본문도 맞지 않을까 싶습니다. 그러나 내용의 깊이는 부족하지 않나 싶습니다. 뭔가 프롬프트를 개선해야 할 것 같습니다.
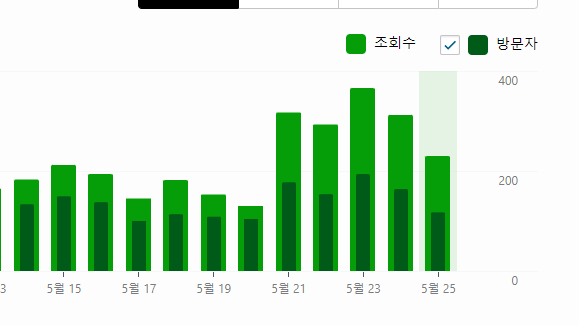
아무말 대잔치의 결과를 보자면.. 포스팅 한개에 0.04$정도 비용이 발생하고, 트래픽으로 보면 아래과 같이 소폭 상승은 했습니다.
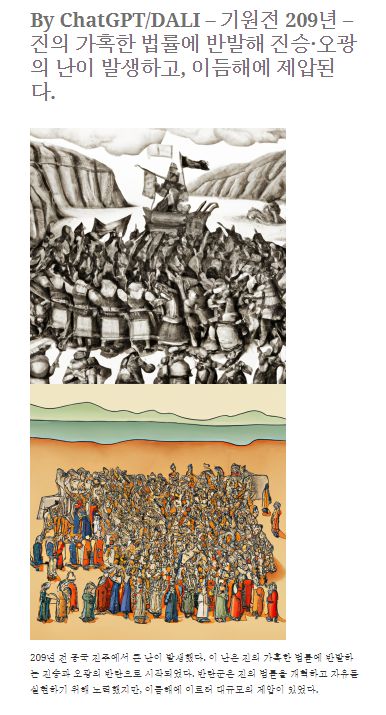
그러나 이렇게 생성된 Contents가 개인적으로 별로 유용하지 않습니다. 내가 저 내용을 알아서 뭐할꺼며.. 아마 Wiki를 보는게 더 정확하고 내용이 깊을것 같습니다. 그러나 내용을 표현해주는 Dali의 그림을 좋아 보입니다. 추후에도 Dali는 좀 사용하것 같습니다.
개인적으로 ChatGPT를 최근에 활용했던 것은 글 작성 -> GPT를 통해서 내용을 좀 더 풍부하게, 그리고 맞춤법등의 보정 -> 글 수정 및 퇴고 의 과정에서 사용했습니다. 그러나 내용을 풍부하게 하면서, 가짜 근거를 만들고 붙여줘서, 마지막 단계에서는 정말 잘 읽어봐야 했습니다.
종합적으로 보면, 내가 정답을 검증 할수 있거나(Code), 정답이 없는 것 (그림 같은거)는 확실히 GPT/DALI가 좋습니다. 그러나 내가 모르는 것에 GPT를 이용했다가는 낭패를 겪을수 있습니다.
하도 GPT를 이용한 자동 포스팅이 유행이라, 공짜 credit으로 한번 해보았으나, 향후에는 보정용으로만 활용하지, 완전히 작성용으로는 사용 안 할것 같습니다. 여기에 사용한 코드 및 간단한 메뉴얼은 별도 포스팅으로 남깁니다.


Leave a Reply